Showing posts with label cake. Show all posts

Thursday, March 13, 2014

Minecraft Cake

I love making creative cakes for my kids.  Minecraft is the 'Thing' right now, so I knew my 7 year old would really enjoy this cake as part of his birthday celebration.  I searched Pinterest for Minecraft cakes and saw ones similar to this posted.  I liked it because it was easy and effective. 

I made all the elements of the cake the night before the party. The base layer of the cake is blue Jell-O.  I made it according to their Jigglers recipe (mix packet with 2 1/2 Cups boiling hot water, place in pan - or in this case casserole baker - in fridge to set).
Separately, I made the Rice Krispie Squares and the Chocolate cake.  The day of the party I put everything together.  It came together quickly. 

1. Slide a knife through the Jell-O to cut into squares - everything about Minecraft is block-y.  The Jell-O is the water.

2. Cut the cake into same size squares - my cake cut into 16 good sized cake pieces. 

3. Frost each square of the cake with green frosting as you place it out.  I placed the cake pieces right on top of the Jell-O.  The cake is the land.  Some of the pieces of cake layers on top of each other to give it that building look of Minecraft.

4. Cut the Rice Krispie Squares into the same size as the Jell-O and Cake squares.  Lay those down as the sand of the beach.

5.  We added to the look of the cake with 2 Minecraft figures (Steve and a Creeper) and their accessories.  Some people who have done a similar cake did use foldable downloads to make their figures with.  The figures were part of our son's birthday present from us. 

Top view of the Minecraft cake ready to go to the party.
It may be simple, but my son and his friend loved it!  They thought it was so cool - and tasty too!

My son looking on as we sang Happy birthday to him.

Friday, March 7, 2014

Penguin Cupcakes!

My sweet daughter turned 4 in January.  We had a penguin party to celebrate!  Instead of cake we had cupcakes.  These little cupcakes were so cute and fairly easy to assemble.  I made a white cupcake and frosted the top with vanilla icing as the base.  For the penguins I used:
 ...Oreos, chocolate chips and Sunkist fruit snacks.  I opened the little packages of fruit snacks and took out all the orange ones.  My kids snacked on the rest.
 I carefully opened up the Oreos, putting aside the cookie only part for later.  The icing part became the face base.

I cut the fruit snacks into 3 pieces each.  One piece became the beak.  The eyes were chocolate chips.
I carefully broke the cookie piece of the oreo in 2, these became the wings.  The trickiest part was making sure the pieces stayed sticking up.  I used a knife to cut a slit to stick the pieces in, this worked.  The remaining cut fruit snack pieces became the feet.  I placed all the cupcakes on a foil lined tray and then sprinkled powdered sugar over everything to make it look like snow.  Very cute and the kids loved them!

Saturday, July 20, 2013

Movie Popcorn Birthday Cake!

My son had a movie themed birthday for his 9th birthday party.  What better to accompany a movie party than a bowl of popcorn looking cake?  This turned out to be super easy and the kids just loved it.  This cake was 3 layers tall.  The bottom two layers I made in 9 inch round cake pans and the top layer was baked in a pie plate, a little shallower, but slightly wider to give it a bit of a bowl effect.
I frosted the layers with a little chocolate icing to stick them together.
Using a serrated knife to cut the rounded top off the layers.

Frosting the cake with vanilla frosting.  I did two layers of frosting.  The first layer gets a little crummy.  I let it set in the fridge before adding a second vanilla frosting layer.
Letting the first layer set in the fridge.
Meanwhile, my kids and I started to work on the popcorn top.  We took mini marshmallows and squished them together with our fingers in 3s to make it look like popcorn.
I mixed a little sugar with a few drops of yellow food coloring (mixing well) to make the "butter".
We then mixed the marshmallows and yellow sugar together.
The cake with its second layer of frosting on.
I unrolled Strawberry Fruit by the Foot and used my pizza cutter to cut the right size strips to make the striped bowl sides.
We then took Nibs and circled them around the top.  We placed the "popcorn" marshmallows all over the top of the cake until it looked full.  I sprinkled a bit more of the yellow sugar on top to give it that real buttery look.  Yes, you can see I used Betty Crocker's pre-made icing for my cake.  I often do as it just makes it easier. 
I then kept the cake in the fridge to keep it nice and firm until it was time for the party.  I usually make my cake a day ahead of time to give me plenty of time to set up for the party, not worrying about the cake too.
My son (in the middle) with a couple of friends at the party.  They thought the cake was pretty cool, and tasty too.

Saturday, April 20, 2013

Chocolate Pecan Cake

A work colleague of mine was finishing up her time with us :(  Instead of buying a cake, I offered to make one.  I knew she loved chocolate so I tried a new to me recipe of Chocolate Pecan cake.  It was tasty, but dense.  It didn't rise the way I would have like and left me wishing I'd made my wacky cake instead.  I think I'd like to go back and play with this recipe a bit as I really liked the idea and the flavour, it just came out a little bit more like a brownie than a cake that's all.  One fantastic part of the cake was that I got to use some of the beautiful Mexican Chocolate my brother sent me from his trip to Mexico.  Yum!
  • 1 1/2 cups  unsalted butter
  • 2 ounces unsweetened chocolate, chopped
  • 2 cups granulated sugar
  • 1/3 cup cocoa powder
  • 1/2 cup buttermilk
  • 2 eggs
  • 2 teaspoons pure vanilla extract
  • 1/2 teaspoon salt
  • 2 cups flour
  • 1 teaspoon baking powder
  • 1/2 teaspoon baking soda
  • 1/2 cup pecans, toasted and chopped
 
Preheat oven to 350 degrees . In large saucepan, melt 11/2 sticks butter, chocolate, granulated sugar, 1/3 cup cocoa and 1 cup water over medium, whisking until smooth and warm. Let cool, 10 minutes. Grease bottom and sides of 9-by-13-inch metal baking pan. Whisk buttermilk, eggs, 1 tsp. vanilla and 1/2 tsp. salt into chocolate mixture. Add flour, baking powder, baking soda and chopped pecans; whisk just until blended. Transfer batter to prepared pan; bake until springy in center, about 45 minutes. 
 
I frosted this cake with some cream cheese icing.  After I wrote on it, I sprinkled a little bit of chopped pecans around the writing, just to pretty it up a bit.


Monday, February 18, 2013

Minnie Mouse Cake

My daughter had a Minnie Mouse party for her birthday this year.  I had been gathering cake ideas on Pinterest for a while.  And there are some beautiful cakes out there!  After having mixed results with marshmallow fondant, and knowing kids don't really like the real stuff, I decided to nix a lot of the fancier cake ideas.  I went back to basics.  This cake was iced with regular old whipped vanilla frosting.  I dyed it pink and away I went.  The polka dots are large white chocolate chip disks found at the Bulk Barn.  I then used a pink ribbon to go around the bottom and to tie a bow on top.  This cake gives a good allusion to Minnie Mouse and I think it turned out super cute.

Sunday, July 29, 2012

New York Cheesecake

I hadn't baked a New York cheesecake in years, but when my son asked for one for his 8th birthday, how could I refuse?  This cake was a mix of 2 recipes.  The crust is just a basic graham cracker crust, very simple and the cake part I got from a Cheesecake Factory copycat recipe, very delicious.

Here's the recipe:

Crust:
23 graham crackers, crushed (my kids loved using the rolling pin for this-just put the crackers in a ziplock bag and smash away)
1/4 cup of margarine or butter, melted
Mix the two ingredients together in a bowl.  Once well mixed, use the mixture to cover the bottom of a 9 inch springform pan.  Bake at 325* for 10 minutes.  Set aside to cool.

The Cake:
  • 1 1/2 lbs cream cheese
  • 1 1/3 cups sugar
  • 5 large eggs
  • 16 ounces sour cream
  • 1/4 cup flour
  • 1 Tablespoon vanilla extract
  • 2 teaspoons lemon juice
  1. Beat cream cheese together (I did all the mixing in my Kitchen Aid)
  2. Add sugar and beat in slowly.
  3. Next add the eggs in one at a time. Make sure each is fully beaten in before adding another one.
  4. Next add flour, vanilla, and lemon juice and mix well.
  5. Add sour cream and beat in.
  6. Pour the mixture into the crust
  7. Place in the oven on the top rack for 1 hour and 15 minutes.
  8. Turn off oven, open the door ( just a crack) and leave cheesecake there for one hour.
  9. Place the cheesecake in the fridge for about 8 hours ( the more you wait the flavors will become better).
  10. Enjoy!


Sunday, May 6, 2012

Black Forest Cake

 It was my husband's birthday last weekend.  His immediate, overwhelming response to what kind of cake he'd like was "Black Forest".  Originally, I was going to make my cheaters version, a combination of wacky cake, cherry pie filling and canned whipped cream.  The disappointment on his face was evident, so I looked up a much more authentic version.  It was worth it.  He loved and I was in cake heaven.  This was so tasty!
It is a bit of work, but not so much that it's difficult.  It looks fancier than it is hard to make.
I found this recipe on Food.com and did change a few things.  Their recipe called for Kirsch, I used maraschino cherry juice in its place to make it kid friendly.  I also could not find canned cherries, so I did use the cherry pie filling, which I like, but purists would take offense to :)

  • 1 2/3 cups cake flour
  • 2/3 cup unsweetened cocoa powder
  • 1 1/2 teaspoons baking soda
  • 1 teaspoon salt
  • 1/2 cup shortening
  • 1 1/2 cups sugar
  • 2 eggs
  • 1 teaspoon vanilla extract
  • 1 1/2 cups buttermilk
  • 1/2 cup kirsch
  • 1 cup butter
  • 3 1/2 cups confectioners' sugar
  • 1 pinch salt
  • 1 teaspoon very strong coffee
  • 2 (14 ounce) cans sweet cherries in heavy syrup, drained
  • 2 cups heavy whipping cream
  • 1/2 teaspoon vanilla extract
  • 1 tablespoon kirsch
  • 1 ounce semisweet baking chocolate

Directions:

  1. Preheat oven to 350 degrees. Line the bottoms of two 8-inch round pans with parchment paper circles. Sift together flour, cocoa, baking soda and 1 teaspoons salt. Set aside.
  2. Cream shortening and sugar until light and fluffy. Beat in eggs and vanilla. Beat into flour mixture, alternating with 1 cup buttermilk, until combined. Pour into prepared pans.
  3. Bake at 350 degrees for 35 to 40 minutes, or until a toothpick inserted into the cake comes out clean. Cool completely. Remove paper from the cakes. Using a thin but sturdy string (dental floss works well), wrap the string around one of the cakes at the halfway mark, horizontally. Tie the string once and pull slowly, cutting through the cake forming two layers. Repeat on other cake. Sprinkle cut side of each layer with kirsch.
  4. In a medium bowl, cream the butter until light and fluffy. Add confectioners sugar, pinch of salt, and coffee, beat adding buttermilk as needed for consistency. Place first layer of cake on plate(cut side down works best for frosting). Spread with 1/3 of the filling. Top with 1/3 of the cherries. Repeat with remaining layers.
  5. In a seperate bowl, whip the cream to stiff peaks. Beat in 1/2 tsp vanilla and 1 TBS kirsch. Frost top and sides of cake. Decorate with chocolate shavings made with a vegetable peeler on chocolate. (I grated mine which worked just as well)
     

Friday, March 9, 2012

Dinosaur Volcano Cake!


My son turned 5 this week.  We had an all dinosaur themed party for him.  This was the cake.  I used an angel food cake pan to bake it in, doubling the amounts of my recipe for Wacky Cake (by far the most used cake recipe for us).  Once the cake was cooled, I covered it in chocolate icing, even spreading the chocolate icing onto the plate (really a cutting board, covered in foil).  I then mixed vanilla icing with red and yellow food dye to make a good lava colour.  I put that icing into the microwave for about 30 seconds to liquify it (it was hot - be careful).  Then, I slowly poured it around the top of the cake to let it naturally flow down over the cake, giving it a realy lava effect.  I like how it made little pools and rivers of lava at the bottom too (tip - turn the edged of the foil up just a little to catch the lava from flowing onto your counters).  The rocks and mud were done by placing Rock Candy and crushed Fudge-E-O cookies around the cake.  And of course the dinosaurs had to be stomping around too!  To complete the effect, we used sparklers instead of candles to make it look as though the volcano was really exploding (I have heard of people using dry ice in the centre for this too).  The kids were wowed by it! 

Wednesday, February 1, 2012

Cookie Monster Cake

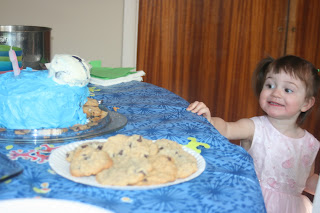
This is my daughter's second birthday cake.  She is loving Sesame Street right now.  The cake was really easy to make.  I used a deep circle shaped Pyrex casserole dish to get the height of Cookie Monster's face.  The eyes are 2 cupcakes that I frosted completely in vanilla icing.  I used mini Oreos for the centres.  The blue colour was probably the most difficult to make.  I used the Wilton's Food Dye for that and it's still not quite dark enough, but probably could have been if I'd been more patient.  The great thing about this cake is that I just piled the icing on, no worries about how messy it looked because Cookie Monster is quite messy!  To get the mouth, I just used a butter knife to cut out a mouth shape and stuffed it with my Banana Chocolate Chip cookies.  I also broke a few and scattered them on the cake plate to finish the effect.  I think she liked it, don't you?


Sunday, January 15, 2012

Snowman Cupcakes

Have I mentioned yet my new found love of Pinterest? Of course, if you are crafty you probably already know about it and are more than slightly hooked on it. Well, my daughter turns 2 tomorrow. We aren't having her party until next weekend, but I couldn't let the day pass without something special. I decided to make cupcakes for her to take to daycare and share with the kids there. I searched 'cupcakes' on Pinterest and my goodness there are some amazing cupcakes out there! Wow! I needed something fairly simple though and I saw these. Aren't they cute? My daughter loves snowmen so this is perfect. The eyes and mouth are upside down chocolate chips and the nose are cut up pieces of fruit gummies - so simple.

Saturday, September 3, 2011

Cake Balls


These big lumps are not balls of play-do. These are for lack of a better term 'Cake Ball". Kind of like Cake Pops without the lollipop stick. I made them for my son's class at the end of the school year for his birthday. (You can tell, I'm way behind at blog posting recipes over here!). The long and the short of it is that this is what I did with a bunch of frozen leftover cake (cast offs from birthday cake molding) and leftover fondant from my other son's Mickey Mouse Cake, also frozen. The kids enjoyed them and I would make them again. Very sweet and very good! This recipe is really random in not having measured ingredients, here's my best guess. 1 cake or the equivalent in leftover cake (I used about 4 cups of cake?) 1 block of cream cheese (250ml or 1 cup) - softened 1 tbsp milk marshmallow fondant (recipe here) Tear the cake into pieces and place into a large bowl. Mix with the softened cream cheese and milk. You can use your hands to really squish and blend everything in. Take bits of the cake mixture and roll into balls. Place onto a baking sheet. Cover with plastic wrap and place into a freezer overnight. The next day, roll out the fondant. Cut into strips, larger than the width of your cake balls. Place cake ball on the the end of a strip and roll up to cover with the fondant. Use your fingers to make edges meet and smooth out the surface. Keep cold until ready to serve.

Saturday, July 2, 2011

Canada Day Strawberry Shortcake


Isn't that cute?  This is the second time I've used this recipe.  I found it on food.com.  The first time I made it using her directions.  This time I made my own little changes and decorated it to look like our flag. The cake part is more like a sweet biscuit than a traditional strawberry shortcake cake.  You can make this and leave the cake as is, putting whipped cream and strawberries over all of it.  Or, you can slice into two cakes, layering it with cake, whipped cream and strawberries, cake whipped cream and strawberries.  Both ways are yummy.

1 beaten egg 
2/3 cup milk
1/2 cup Splenda or sugar 
1/2 cup butter, softened (real butter is so much better than margarine in baking)
2 cups flour 
2 teaspoons baking powder
1 cup whipping cream, whipped (I usually add a tbsp of sugar to sweeten it a bit)
sliced strawberries (as many as needed)

Preheat the oven to 450*.  In a medium sized mixing bowl beat the egg.  Add the milk and sugar and mix together.  Whip in the butter.  Add the flour and baking powder.  Mix well.  Using your hands kneed the dough for a minute.  Bake in a 9 x 9 inch pan for 15-20 minutes.  Cool.  Remove from pan.  From here you can either decorate it with the whipped cream and strawberries, or, slice it into two, then layering the cake, whipped cream and strawberries.  Enjoy!

Wednesday, June 22, 2011

X-Wing Cake

My son started planning his 7th birthday party slightly before his 6th birthday party happened. His 6th birthday had a superhero theme with a fantastic Spider-Man cake, one of my favorite cakes I'd done. For his 7th he wanted Star Wars. I started planning an R2 D2 cake. I thought about a Millennium Falcon. Nope, he wanted an X-Wing. Really? Does he think I'm Cake Boss Buddy? He would do an amazing one. Me? My skills are limited. I couldn't quite figure out how to do the X wings, so they are closed on this one.
The body of the cake was made with a 9x12 pan, then cutting out the shape. The wings were made in 2 small bread pans (one recipe split into 2) and then cutting the shape. The cake is covered in vanilla icing. I then used a combination of licorace, ju-jubes, chocolates and oreo straws to make the decorative features. I know it isn't my best cake (that would be my other son's Mickey Mouse Clubhouse cake) but this worked and I was pleased with it.

Sunday, May 29, 2011

Sheep Cupcakes


Aren't these cute! This was my craft idea for last night's messy church at my church. Messy church is a once a month event that we have for families. Each "Messy"
involves a craft, an interactive lesson and dinner for families. Last night's theme was "The Good Shepherd knows his sheep". I knew we hadn't had a food craft in a while and have never done cupcakes, so I googled sheep cupcakes to see what I could find. I found the idea for these on the Food Network's Site. Their cupcakes are slightly different than the ones we did. You can see theirs here. We couldn't quite find all of the decorating ingredients that they used (the candy eyes and the gumdrop noses) so we improvised and used mini M&M's. I also didn't make their cupcake recipe so I don't know what that part tastes like. I did make their icing, but had to abandon it as it was too thick and tearing the cupcakes apart. Fortunately, I discovered this as I was making the sample 45 minutes before the event started and had time to head out to the store and pick up some ready made. The ready made worked well and was easy for the kids to use. The kids and parents really loved this craft. And that is what I would recommend it for, a craft. It is very time consuming - unless you are the kind of person who loves to spend all afternoon decorating cupcakes like this.

How to make:

Make the cupcakes first, try out the foodnetwork.com recipe, your favorite recipe or cheat like me and use a box mix - let cupcakes cool.

For decorating:
-frosting
-marshmallows (1 per cupcake)
-mini marshmallows (24-30 per cupcake)
-mini M&M's (3 per cupcake)
-purple mini jellybeans (4 per cupcake)
-pink mini jellybeans (2 per cupcake)
-licorice shoelaces (cut into 1cm and 3cm pieces - 1 each per cupcake)

Frost the cupcake. Stick a large marshmallow on top to be the sheep's body. Use the frosting like glue for the rest of the stick on ingredients, putting the frosting on it first and then sticking on. Start with the Mini M&M's for eyes and nose. Use the 1 cm licorice shoelace for the mouth. Start at the bottom and work your way up and around with the mini marshmallows to make the sheep's wool. Use the 4 purple jellybeans for feet and the pink ones for ears. Take the 3cm licorice shoelace, curl it and stick it on for a tail. So cute!

Wednesday, March 9, 2011

Mickey Mouse Clubhouse Cake

Here it is, my son Jeremy's 4th birthday cake!  This is my first cake using marshmallow fondant.  I am so pleased with the results!  I have stayed away from fondant in the past because let's face it, it looks pretty but tastes disgusting!  Marshmallow fondant is different.  It looks great and tastes nice and sweet, the way icing should taste.  I used a lot of icing dye to get the colours just right.  It takes a while to really kneed it into the icing so it has an even consistancy (especially red, the blues and yellow wasn't as much work).  The figures I picked up as a set at the Disney store.  If I keep making cakes like this, I may have to invest in some more cookie cutters (I could use a set of letters anyway).  I used the fondant recipe found here with no adjustments needed.

Sunday, January 16, 2011

Daisy flower birthday cake

My darling baby girl turned one today!  Here's the cake I made for her.  I have to say it's fun to make a cake for a little girl.  My husband thinks this is my best cake to date.  I don't know if that's true, but I think it's pretty cute :o)

Tuesday, September 14, 2010

Chocolate Zucchini Loaf - Amazing!

I thought I had an amazing chocolate zucchini loaf recipe posted on here, but I was mistaken (until now!)  So I visited one of my favorite foodies who always posts good baking, Monica at Lick the Bowl Good.  I was right.  She has a fantastic chocolate zucchini recipe.  Hers is for a bundt cake, but she posted that she has made it as a loaf and muffins before, so I took her word for it and used her recipe.  Thank you Monica!  This was so delicious.  My 3 year old just thought he was eating chocolate bread all week.  He had no idea that there was veggies inside.  Monica's original recipe can be found here.  Take a look.


  • 2/3 cup cocoa
  • 2 tbsp. unsalted butter, melted
  • 1 cup vegetable oil
  • 3 cup flour
  • 1-1/2 tsp. baking powder
  • 1 tsp. baking soda
  • 1 tsp. salt
  • 4 large eggs
  • 3 cup sugar (plus more for coating pan)
  • 3 cup grated zucchini (4 med. zucchini)
  • 1 tsp. vanilla 
Preheat oven to 350 degrees. In a small mixing bowl combine cocoa and melted butter . Add vegetable oil to cocoa and set aside.
In a medium bowl sift together flour, baking powder, baking soda, and salt. Set aside. 
 In a large mixing bowl beat eggs and slowly add sugar, until thick and light in color. Add cocoa mixture to eggs until well combined, then gradually add flour being careful not to over mix. Once mixture is well incorporated add grated zucchini and vanilla.
Butter or spray pan evenly with non stick spray, then sprinkle with granulated sugar to form a sugar crust. Pour batter into pan about 3/4 full. Place pan in a preheated oven for 65-70 minutes until toothpick inserted comes out clean.

Thursday, August 5, 2010

Spider-Man Cake


Those of you who have followed my blog for a while know that I usually make a wacky cake for my kids birthdays. My oldest son turned 6 last week. He's very into super heroes right now. This is the cake I made for him. To get the shape of Spider-Man's face, I first made a double batch of the wacky cake batter (recipe found here) in a large rectangular pan. I then traced a Spider-Man shaped head on the cake before cutting it out. I scooped out the sides of the cake (and froze them, I mean to make something out of the cake bits later) and then turned the cake over to the foil lined cutting board. I then froze the cake over night. Freezing the cake makes it much easier to decorate. The rest I did by looking at a picture of Spider-Man. The eyes I made by shaping a couple of white chocolate pieces, laying them down on top of the red icing. I did all the black icing last. I am really happy with the result and it turned out to be one of the easier cakes I've done.

Monday, March 8, 2010

Jeremy's Cars Cake


While I may be taking it easy cooking full force right now, there was no way that I was going to buy a birthday cake for my son's 3rd birthday. I used my wacky cake recipe (which I always use for my kids birthday cakes - it always turns out). The Cars characters came out of a pack of toys I fluked out to find. It was tricky to find a pack that had McQueen, Mater and Doc altogether. The road is lined with Reese's Pieces (my snack habit right now, Jeremy loves them too). An easy way to make a cute cake.

Monday, August 10, 2009

Pineapple Upside Down Cake


I had this huge craving for pineapple upside down cake last week and while I was on Cheryl's site (Cooking Dunkin Style)there was a link within to her pineapple upside down cake. I adapted it a little, but stayed pretty true to her recipe.
While I was making this I was reminded of cooking over the campfire for Girl Guides. Did anyone else make pineapple upside down cake in a can back then? This one is much more sophisticated I'm sure :o)

1st - heat up the stove to 350 - melt margarine or butter in your cake pan (round is best) (a few spoonfuls) add brown sugar and smooth together over the bottom of the pan (another few spoonfuls). Take out of the oven and set aside until later.

In a mixing bowl mix together the following:
1/2 cup unsalted butter, softened - I used margarine
2/3 cup brown sugar
2 large eggs
1 teaspoon vanilla
3/4 cup milk
Mix all the wet ingredients together first and then add the dry
2 cups all-purpose flour
1 1/2 teaspoons baking powder
1/2 teaspoon salt
1/2 teaspoon cinnamon

1st - add pinapple rings to the bottom of the cake pan. Set a marichino cherry inside each if you wish.
2nd - pour the cake batter over top and spread out evenly.
3rd- Bake the cake in the middle of the oven for 45 to 55 minutes, or until a tester comes out clean. Let the cake cool in the pan on a rack for 15 minutes, run a thin knife around the edge, and invert the cake onto a plate.

*I used a spring-form cake pan when making this. I recommend setting it on top of a
baking sheet as some of the margarine leaked out a bit when melting. If you do use one of these, just let the cake cool for 15 minutes and then turn over onto a plate, release the triggers to let the cake out.